Description:
liquid-glass-react is a React component library that brings Apple’s new Liquid Glass design concept to web applications through advanced 3D rendering techniques.
It uses WebGL technology to create physics-based glass effects that respond dynamically to content changes.
The component captures screenshots of underlying page elements and applies sophisticated shader calculations to simulate real glass behavior, including chromatic dispersion and surface roughness variations.
Features
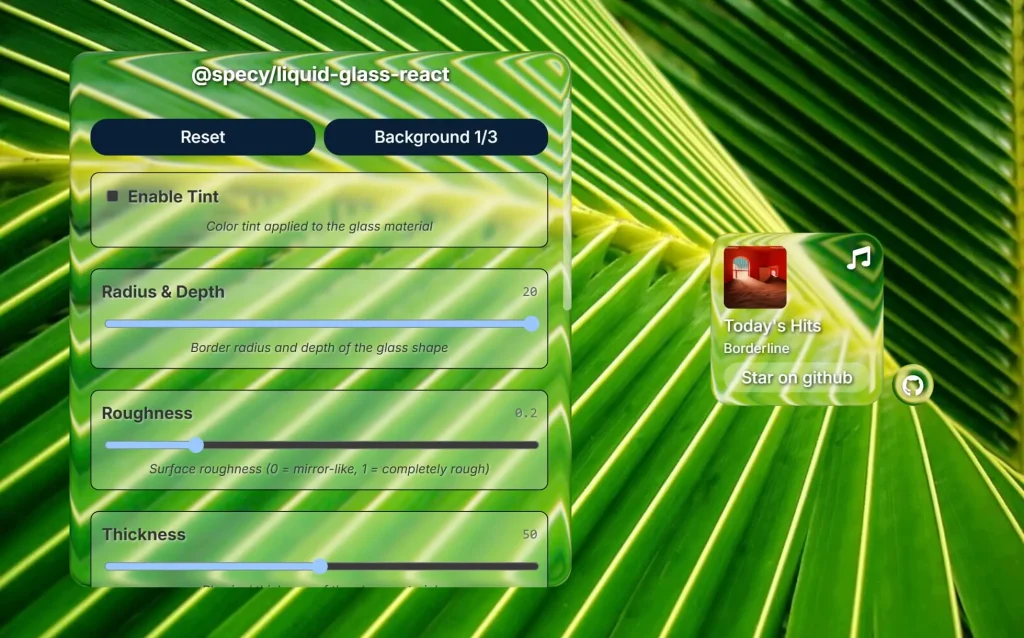
- 🎨 Customizable Glass Properties – Control depth, transmission, roughness, reflectivity, and chromatic dispersion.
- ⚡ Real-time Updates – Dynamic screenshot capturing and style modifications without component remounting.
- 🎯 Performance Optimized – Memoization support and efficient WebGL rendering with minimal re-renders.
- 📱 Responsive Design – Adapts to content size changes and viewport modifications automatically.
- 🎭 Multiple Geometry Options – Configurable segment count and border radius for different visual styles.
- 🌈 Color Tinting – Optional color overlays with hex color support for branded glass effects.
- 🔄 Background Capture – Automatic screenshot generation from target elements for realistic glass distortion.
Preview
How to Use It
1. Install the package using npm or yarn package managers.
npm install @specy/liquid-glass-react2. Import the LiquidGlass component and wrap your content. The component requires memoized configuration objects to prevent unnecessary re-renders during the expensive initialization process.
import React, { useMemo } from 'react';
import { LiquidGlass } from '@specy/liquid-glass-react';
function BasicGlassComponent() {
  const glassConfig = useMemo(() => ({
    depth: 0.6,
    segments: 48,
    radius: 0.25,
    roughness: 0.08,
    transmission: 0.92,
    reflectivity: 0.4,
    ior: 1.52,
    dispersion: 0.08,
    thickness: 0.4
  }), []);
  return (
    <LiquidGlass
      glassStyle={glassConfig}
      wrapperStyle={{
        position: 'absolute',
        top: '50%',
        left: '50%',
        transform: 'translate(-50%, -50%)',
        width: 'auto',
        maxWidth: '600px'
      }}
      style="padding: 2rem; border-radius: 12px;"
    >
      <div>
        <h2>Glass Panel Content</h2>
        <p>Your content appears inside the glass effect with realistic light behavior.</p>
        <button>Interactive Elements</button>
      </div>
    </LiquidGlass>
  );
}
3. Access component methods through React refs for programmatic control over glass properties and screenshot updates.
import React, { useRef, useMemo, useCallback } from 'react';
import { LiquidGlass, type LiquidGlassRef } from '@specy/liquid-glass-react';
function AdvancedGlassComponent() {
  const glassRef = useRef<LiquidGlassRef>(null);
  const glassProperties = useMemo(() => ({
    depth: 0.75,
    segments: 64,
    radius: 0.35,
    tint: 0x4A90E2,
    transmission: 0.88,
    roughness: 0.12,
    reflectivity: 0.6,
    ior: 1.48,
    dispersion: 0.15,
    thickness: 0.6
  }), []);
  const handleInstanceReady = useCallback((instance) => {
    console.log('Glass instance initialized:', instance);
  }, []);
  const refreshBackground = useCallback(async () => {
    if (glassRef.current) {
      await glassRef.current.updateScreenshot();
    }
  }, []);
  const randomizeGlass = useCallback(() => {
    if (glassRef.current) {
      glassRef.current.updateGlassStyle({
        depth: Math.random() * 0.8 + 0.2,
        transmission: Math.random() * 0.3 + 0.7,
        roughness: Math.random() * 0.2
      });
    }
  }, []);
  return (
    <div>
      <LiquidGlass
        ref={glassRef}
        glassStyle={glassProperties}
        onReady={handleInstanceReady}
        targetElement={document.getElementById('background-content')}
        wrapperStyle={{
          position: 'fixed',
          bottom: '20px',
          right: '20px',
          width: '350px'
        }}
      >
        <div style={{ padding: '24px' }}>
          <h3>Control Panel</h3>
          <button onClick={refreshBackground} style={{ margin: '8px' }}>
            Update Background
          </button>
          <button onClick={randomizeGlass} style={{ margin: '8px' }}>
            Randomize Effect
          </button>
        </div>
      </LiquidGlass>
    </div>
  );
}
4. Configure the Liquid Glass interface with the following props.
- depth (0-1) – Controls the visual thickness of the glass effect
- segments (number) – Geometry detail level for smoother curves at higher values
- radius (0-1) – Border radius amount for rounded corners
- tint (hex number) – Optional color overlay applied to the glass surface
- roughness (0-1) – Surface texture from smooth (0) to frosted (1)
- transmission (0-1) – Light transmission from opaque (0) to clear (1)
- reflectivity (0-1) – Mirror-like reflection intensity
- ior (number) – Index of refraction for light bending behavior
- dispersion (0-1) – Chromatic aberration effect strength
- thickness (number) – Physical glass depth for refraction calculations
5. The component exposes programmatic control methods through React refs.
// Get the underlying glass instance
const instance = glassRef.current?.getInstance();
// Force background screenshot update
await glassRef.current?.updateScreenshot();
// Complete component refresh
await glassRef.current?.forceUpdate();
// Modify glass properties dynamically
glassRef.current?.updateGlassStyle({
  transmission: 0.95,
  roughness: 0.05
});
// Retrieve current configuration
const currentStyle = glassRef.current?.getGlassStyle();
// Access DOM elements
const containerElement = glassRef.current?.getElement();
const contentWrapper = glassRef.current?.getContent();
FAQs
Q: Why does my glass component re-render frequently?
A: Always memoize the glassStyle object and callback functions using useMemo and useCallback hooks. The component performs expensive WebGL operations during initialization, so preventing unnecessary re-renders is critical for performance.
Q: How do I fix blurry or distorted glass effects?
A: Increase the segments property for smoother geometry or call updateScreenshot() after content changes. The component captures background screenshots for realistic refraction, so outdated captures can cause visual artifacts.
Q: Can I use multiple LiquidGlass components on the same page?
A: Yes, but each instance creates separate WebGL contexts. Monitor performance with multiple components and consider reducing segments or other properties if you experience frame rate drops.
Q: What happens if WebGL is not supported?
A: The component gracefully degrades by rendering your content without glass effects. You can detect WebGL support and provide fallback styling for unsupported browsers.
Q: How do I customize the glass container styling?
A: Use the wrapperStyle prop for React CSS properties and the style prop for custom CSS strings. The wrapperStyle applies to the outer container while style affects the inner content area.


