Description:
video2ascii is a WebGL-powered React component that renders video content as dynamic ASCII art.
It uses WebGL shaders to process video frames in real-time and maps pixel luminance to specific character sets.
Features
- 🔧 WebGL Acceleration: Processes video frames using a custom fragment shader for fast pixel sampling and ASCII conversion.
- 🎬 Real-Time Conversion: Analyzes and redraws the ASCII representation synchronously with the video playback.
- 🎨 Customizable Output: Adjusts the visual style through the number of ASCII columns, color application, brightness, and blend levels.
- 📊 Multiple Character Sets: Switches between preset charsets like standard terminal characters, detailed gradients, blocks, or emojis.
- 🖱️ Interactive Effects: Adds optional mouse-driven glow trails and click-triggered ripple distortions over the ASCII canvas.
- 🔊 Audio Reactivity: Modifies the ASCII output’s brightness based on the audio track’s frequency data.
- 🎛️ Playback Control: Manages video state via props for play, pause, and autoplay, including optional spacebar toggle.
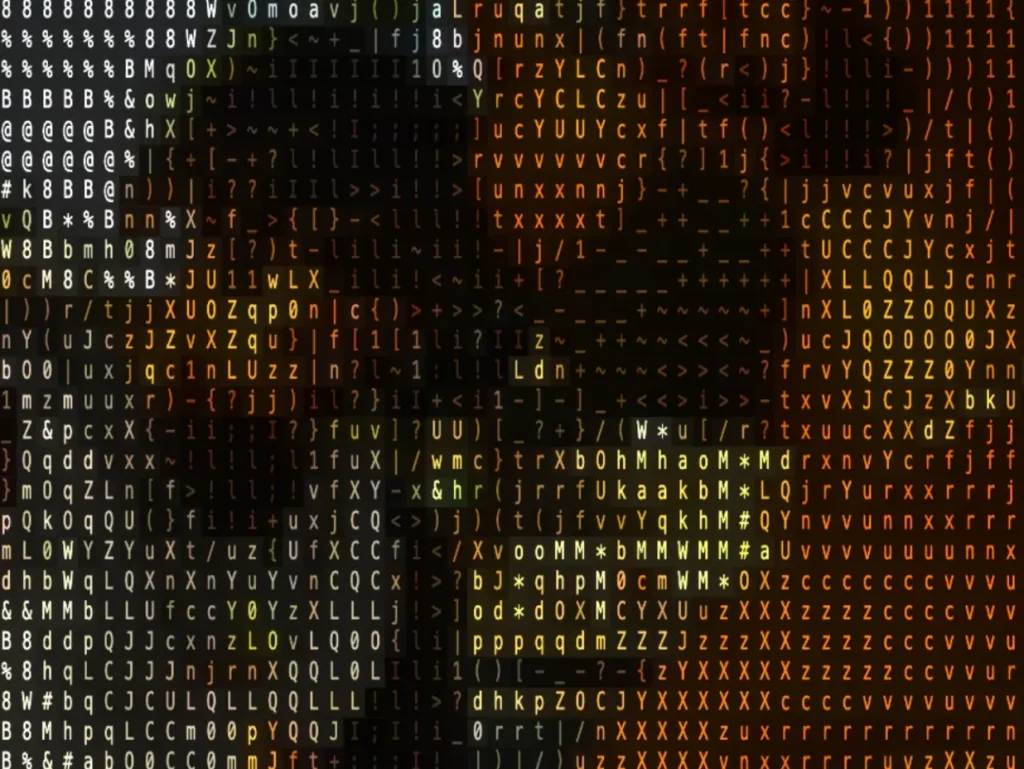
Preview
Use Cases
- Retro Portfolios: Creates 90s hacker-style personal websites with video backgrounds.
- Creative Landing Pages: Adds artistic, glitch-style video elements to hero sections.
- Music Visualizers: Generates audio-reactive backgrounds for media players.
- 404 Pages: Displays glitchy or terminal-themed error messages using looped video.
How to Use It
1. Install the package via npm to add it to your project dependencies.
npm install video2ascii2. Import the component and pass a video source URL. The component handles the loading and rendering automatically.
import Video2Ascii from "video2ascii";
export default function App() {
  return (
    <div style={{ width: "100vw", height: "100vh" }}>
      <Video2Ascii
        src="/assets/video.mp4"
        numColumns={100}
        colored={true}
        autoPlay={true}
        isPlaying={true}
      />
    </div>
  );
}
3. You can customize the character set and enable interactive effects. This example uses the “detailed” charset and enables audio reactivity.
import Video2Ascii from "video2ascii";
export default function CreativePlayer() {
  return (
    <Video2Ascii
      src="/assets/concert.mp4"
      // Visual Settings
      numColumns={120}
      charset="detailed" // Uses full gradient characters
      brightness={1.2}
      blend={20} // Mixes 20% original video with ASCII
      // Interactivity
      enableMouse={true}
      trailLength={30}
      enableRipple={true}
      rippleSpeed={50}
      // Audio Reactivity
      audioEffect={60} // Audio impacts brightness by 60%
      audioRange={80}  // High dynamic range for audio changes
      // Controls
      enableSpacebarToggle={true}
      showStats={true} // Shows FPS
    />
  );
}
4. All available component props:
| Prop | Type | Default | Description |
|---|---|---|---|
src | string | Required | The URL of the video file to render. |
numColumns | number | – | Defines the horizontal character count (resolution). |
colored | boolean | true | Renders video colors instead of green terminal text. |
brightness | number | 1.0 | Multiplies pixel brightness (0-2 range). |
blend | number | 0 | Blends original video with ASCII (0 = ASCII, 100 = Video). |
highlight | number | 0 | Sets background opacity behind characters (0-100). |
charset | string | "standard" | Selects the character set used for rendering. |
enableMouse | boolean | true | Activates the cursor glow effect. |
trailLength | number | 24 | Sets the length of the mouse movement trail. |
enableRipple | boolean | false | Triggers a ripple animation on click. |
rippleSpeed | number | 40 | Controls the expansion speed of the ripple. |
audioEffect | number | 0 | Determines how much audio affects brightness (0-100). |
audioRange | number | 50 | Sets the sensitivity range for audio reactivity. |
isPlaying | boolean | true | Controls the play/pause state of the video. |
autoPlay | boolean | true | Starts the video automatically upon load. |
enableSpacebarToggle | boolean | false | Toggles play/pause when the spacebar is pressed. |
showStats | boolean | false | Displays an FPS performance overlay. |
className | string | "" | Applies custom CSS classes to the container. |
5. Available Character Sets:
standard:@%#*+=-:.detailed: Full gradient (70 characters)blocks:█▓▒░minimal:@#.binary:10dots:●◉○◌arrows:↑↗→↘↓↙←↖emoji: Various emoji symbols
Related Resources
- ascii-art: A Node.js library for generating ASCII art from images, text, and SVGs, useful for server-side or build-time generation.
- React Three Fiber: A React renderer for Three.js that handles 3D graphics and WebGL scenes.
FAQs
Q: How does it handle different video sizes and aspect ratios?
A: The component automatically scales the ASCII output to fit the container while preserving the video’s original aspect ratio. Adjust the numColumns prop to control the density of the ASCII grid.
Q: How does the audio reactivity work?
A: The component analyzes the audio track of the video source and modulates the brightness of the ASCII characters based on volume levels.
Q: Can I use my own custom characters?
A: The current API restricts selection to the predefined presets like standard, blocks, or emoji.
Q: Does increasing the column count affect performance?
A: Yes, higher numColumns values require the GPU to render more individual characters.